Sunday, June 5, 2011

Green ♺ Machine

Ok this time it's really the finishing touch. First off, I decided on a name for my bike. It's "Green ♺ Machine." I thought this was right on a few levels. First the color is a weird kind of green and the seat's definitely green. Also it's a human-powered vehicle, so that's green too. Finally it's a recycled bike, being made from parts of other bikes that might otherwise have been discarded. Green green green.

So I thought about trying to print decals myself but couldn't find the right stock for the printer. I found an excellent online vendor though, http://bikenames.com. Very high quality vinyl cut letters. I got the 3/4"x7" size pair for $8.99 and free shipping. Seems like a fair deal to me, definitely better than what I could have done myself. It looks very professional. Here's a photo.

From Recumbent Bike Project

Tuesday, May 17, 2011

Finishing Touches

Today I put a couple of finishing touches on the bike. One is a sweet head badge that Andrew Carson sent me. Thanks Andrew, it really looks nice!

From Recumbent Bike Project


The other is a safety flag. Don't have a picture of this yet but it's not really necessary. I feel safer with that thing waving above me. I also decided just to remove my chain idler altogether. It was noisy and annoying, and I don't think my chain really needed it. The bike still rides perfectly without the idler, the chain's high enough off the ground, and it's soooo quiet now! Love it.

Friday, May 13, 2011

Now I Can Carry Stuff!

One of the biggest problems I've had in the early days of riding this bike is the total lack of cargo capacity. You can't wear a backpack like a normal bike, stuff falls out of your pockets when you sit down, and it didn't have a rack or anything. I solved the pocket problem by putting a little underseat pouch for keys and pocket items. That was great but what about bigger stuff? Last night I hacked together a rear cargo rack that will carry the Jandd grocery bag panniers I use on my Trek mountain bike.

First I took a generic rack off of one of my other bikes:

From Recumbent Bike Project


I was hampered a bit by my rear seat support but I discovered that if the front attaching part of this rack were removed, it ought to fit the recombent. I'd just have to find a way to attach it. So I cut off the front part so it looked like this:

From Recumbent Bike Project


I drilled new holes in the rear seat support down by the other holes, then mounted with cut-off skateboard mounting bolts & locknuts, securing the front of it with zip-ties for the moment:

From Recumbent Bike Project


Here's what it looks like with the Jandd bag stuck on there. Love it!

From Recumbent Bike Project


Today I stopped by Guidry Hardware and got a small hose clamp to replace the zip ties. Now it's very secure and I can carry stuff!

Wednesday, May 11, 2011

The Finished Bike

The frame came back from the powder coat place today and I LOVE it! It's coated in a fire-engine greenish yellow, with black on the fork, seat supports, etc. I guess with this the project is officially done. Here are some shots.

From Recumbent Bike Project


From Recumbent Bike Project


From Recumbent Bike Project


From Recumbent Bike Project


From Recumbent Bike Project

Saturday, May 7, 2011

Riding the new bike

All I can say is WOW!! This bike is so comfortable and so much fun to ride that I can hardly stop riding it! After about 4-5 days riding it every day, I've gotten very comfortable with the long wheelbase and low center of gravity. I've been riding around campus at night and today I took a nice ride around the Saints' Streets. Man it's so great. This bike has brought the "pleasure ride" back after many years absence. I can ride almost indefinitely because there's no wrist, neck, or butt fatigue at all. These are the things that always kept my rides short in the past. Now I just want to ride and ride. So fun.

Now for something kind of important. I think this bike needs a name. I've thought for a while and I'm leaning toward "Geezer Pleaser" (or "Pleezer"). I'm also hoping to talk to a powder coating place on Monday. Need to finish this thing up properly.

Wednesday, May 4, 2011

Shifter cable, front brakes, other details

This morning I installed the shifter cable for rear derailleur and I'm happy to say the shifters from the donor bike work perfectly, even though kinda outdated. I also installed a front brake, although it's not very good and I'll likely buy a new one soon.

A couple of other details got attention today. First I took my calipers with me to Goodwill in hopes of finding another donor bike to give me a proper stem to fit these handlebars and the fork. The shims I made for the original stem were slipping. I found this Princess bike with the right stem and it only cost me $4.99. Checking compatibility in this photo:

From Recumbent Bike Project


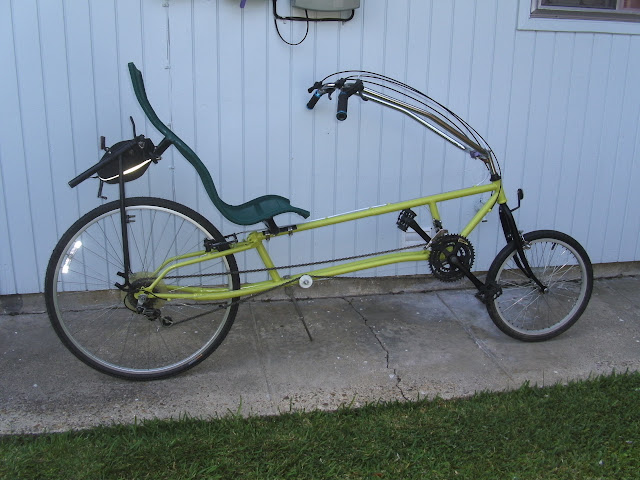
And here it is installed:

From Recumbent Bike Project


This stem is much better. Glad to have this problem solved. My daughter wants to ride the princess bike now so we'll have to find another stem for it. :)

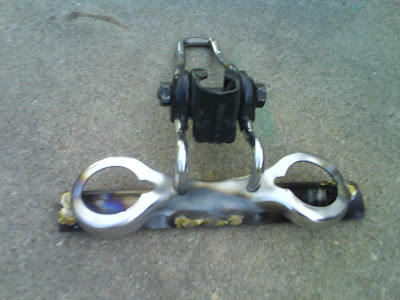
I also noticed the chain was rubbing the rear shifter cable a bit, so I solved this by adding a washer to the idler to shove it out about 2mm. This did the trick.

I've been riding the bike all over town today and it's excellent. The guys at Recycled Cycles were impressed, too. I do need to practice tight turns, though. They're hard on this long wheelbase. Last thing to do is install front derailleur. No urgency to this though.

Tuesday, May 3, 2011

Last welds and a test ride

Tonight I got a bit of time in the metal shop and did the final welds to attach a split tube to the rear seat support, making a bracket that can attach to the seat with hose clamps. Here's how it looks:

From Recumbent Bike Project


From Recumbent Bike Project


So after I attached the seat securely I installed a shiny new (low-end) Shimano V-brake in the rear and then installed the tandem-length brake cable.

Oh wait. Almost forgot. I got my ape-hanger hi-rise handlebars yesterday only to find they were the wrong diameter for my stem. Couldn't tighten it at all. Solution was to cut the flared 1" section of another pair of handlebars and split it in half to make a shim. This hack worked o.k. I don't know if I want to keep these handlebars on it though. They're really big. I'm considering an underseat steering system. At any rate, I got a brake installed and took it for my first test ride. I only could use one gear because I still don't have the shifter cable installed, but it was good enough to ride around a bit and get this video. Fun!


The recumbent position will take some getting used to. I've never ridden one of these things before. It's pretty comfortable but has a very different feel, for sure. Next step is to get the shifters working and decide what to do about painting.